

Search our help centre
Help with your account
Getting started with Point of Sales Terminals
We take the time to evaluate your particular business situation and match you to the best solution for your unique needs. Our range of tools, products and solutions will simplify your life and increase the profitability of your business.
- If you have fixed points of sale our countertop terminal is perfectly suited
- If you operate in a roaming environment then our portable Bluetooth, cradle-based terminal is for you.
- And if you are more mobile or function away from telephone lines, turns your Smartphone or tablet into a mobile payment terminal with MobileMerchant a GPRS based terminal (which uses the same technology as a mobile phone)
Installing the terminal is simple. Once you’ve completed the setup steps on our tv tutorials page, you’ll be ready to start processing transactions.
Get ready for your terminal installation
Thank you for ordering your new card payment terminal
To ensure a smooth installation and minimal disruption to your business we need you to ensure that everything else in your processing environment is ready.
Important things to checks before your engineer arrives
Please take a moment to complete the following terminal and internet checks and ensure that all of the necessary connectivity and access requirements are available, ahead of your terminal installation appointment.
Terminal checks
It’s important that you check that everything your terminal will need to operate correctly is in place before installing your terminal. To do this simply find the terminal you have ordered in the following table and complete the tick boxed requirements.
If you are not able to confirm that all of your terminal technical requirements are available then please contact us immediately and we will help you work through next steps. When it comes to checking your connectivity options, it may not be necessary to tick all options, but certainly the ones you are choosing to use as your main and back-up options.
|
Terminal |
What Do I Need? |
|---|---|
|
Ingenico DX8000 A portable Android SmartPOS terminal for payments any place anywhere |
Mains electricity supply for the base charging station, within 3ft / 1.2m of the terminal’s location
The power cable for the charging base can be plugged directly into the terminal if needed.
For GPRS connection, if you have difficulties using your mobile phone at your location it’s worth considering another type of terminal connection.
For Wi-Fi connection, a Wi-Fi network with 2.4 GHz wireless frequency and not available for public use, plus… If home or small business, WPA / WPA2 encryption If enterprise / managed access, authentication with EAP-MD5, EAP-TLS, EAP-TTLS, EAP-PEAP v0 to RADIUS server, Login / password process caters for a standard RADIUS server interaction with no web login page |
|
Poynt P61 |
For internet connection, an internet port within 6ft / 2m of the terminal’s location and broadband speed of a minimum 5mb download and 2mb upload
For GPRS connection, broadband speed of a minimum 5mb download and 2mb upload. Our multi carrier SIM card will be provided
For WiFi connection, the network must be password protected, and not available for public use that supports 802.11 a/b/g/n and dual channel 2.4, 5 GHz operation |
|
Ingenico DESK 5000 |
Mains electricity supply within 6ft / 2m of the terminal’s location
For internet connection, an internet port within 6ft / 2m of the terminal’s location
For Smartlink integration connecting till and terminal via USB or serial port, one available USB or serial port on the till |
|
Ingenico MOVE 5000 |
Mains electricity supply for the base charging station, within 6ft / 2m of the terminal’s location
For Bluetooth connection via the internet, an internet port within 6ft / 2m of the terminal’s location
For GPRS connection, if you have difficulties using your mobile phone at your location it’s worth considering another type of terminal connection
For WiFi connection, a WiFi network with 2.4 GHz wireless frequency and not available for public use, plus.
If home or small business, WPA / WPA2 encryption If enterprise / managed access, authentication with EAP-MD5, EAP-TLS, EAP-TTLS, EAP-PEAP v0 to RADIUS server, Login / password process caters for a standard RADIUS server interaction with no web login page
|
|
Ingenico LANE 3600 PIN pad only |
Additional USB port on till to supply power OR
Mains electricity supply within 6ft / 2m of the terminal’s location
For internet connection, an internet port within 6ft / 2m of the terminal’s location
For sharing till’s internet connection, a suitable USB / Ethernet adapter
|
Terminal
What Do I Need?
Ingenico DX8000
A portable Android SmartPOS terminal for payments any place anywhere
Mains electricity supply for the base charging station, within 3ft / 1.2m of the terminal’s location
The power cable for the charging base can be plugged directly into the terminal if needed.
For GPRS connection, if you have difficulties using your mobile phone at your location it’s worth considering another type of terminal connection.
For Wi-Fi connection, a Wi-Fi network with 2.4 GHz wireless frequency and not available for public use, plus…
If home or small business, WPA / WPA2 encryption
If enterprise / managed access, authentication with EAP-MD5, EAP-TLS, EAP-TTLS, EAP-PEAP v0 to RADIUS server, Login / password process caters for a standard RADIUS server interaction with no web login page
Poynt P61
A smart terminal for seamless wireless activity anywhere in your business
For internet connection, an internet port within 6ft / 2m of the terminal’s location and broadband speed of a minimum 5mb download and 2mb upload
For GPRS connection, broadband speed of a minimum 5mb download and 2mb upload. Our multi carrier SIM card will be provided
For WiFi connection, the network must be password protected, and not available for public use that supports 802.11 a/b/g/n and dual channel 2.4, 5 GHz operation
Ingenico DESK 5000
Fixed counter-top terminal with optional PIN pad and Smartlink integration
Mains electricity supply within 6ft / 2m of the terminal’s location
For internet connection, an internet port within 6ft / 2m of the terminal’s location
For Smartlink integration connecting till and terminal via USB or serial port, one available USB or serial port on the till
Ingenico MOVE 5000
A portable tri-comms terminal for payments on the move
Mains electricity supply for the base charging station, within 6ft / 2m of the terminal’s location
For Bluetooth connection via the internet, an internet port within 6ft / 2m of the terminal’s location
For GPRS connection, if you have difficulties using your mobile phone at your location it’s worth considering another type of terminal connection
For WiFi connection, a WiFi network with 2.4 GHz wireless frequency and not available for public use, plus.
If home or small business, WPA / WPA2 encryption If enterprise / managed access, authentication with EAP-MD5, EAP-TLS, EAP-TTLS, EAP-PEAP v0 to RADIUS server, Login / password process caters for a standard RADIUS server interaction with no web login page
Ingenico LANE 3600 PIN pad only
Fixed counter-top terminal (Smartlink Integration only)
Additional USB port on till to supply power OR
Mains electricity supply within 6ft / 2m of the terminal’s location
For internet connection, an internet port within 6ft / 2m of the terminal’s location
For sharing till’s internet connection, a suitable USB / Ethernet adapter
Internet check
When data is sent or received over the internet, it is sent to an IP (Internet Protocol) address and a specific port. So when it comes to taking payments it’s essential to check with your internet provider that the associated ports and IP addresses are allowed, as shown in the table on the below.
If using DHCP
Ensure a correct DNS1 and DNS2 address is passed from the router / DHCP server. It is recommended that DNS1 and DNS2 are populated.
If using static IP
The following details are required:
- Static IP address
- IP Gateway
- Subnet details
- DNS address
You will require two DNS server addresses for Tetra terminals. If a secondary DNS address is not known, a public DNS can be used.
Your firewall configuration needs to include a DNS address access. The MAC address of the terminal can be provided at the time of installation if required for firewall configuration.
If using Smartlink
Till and terminal need to communicate together via six different ports (listed in the table on the next page) so you need to check that these are not blocked by firewall rules or any security and anti-virus software used on your till system.
Ingenico DX 8000 – Firewall Rules
|
Application |
URL |
|---|---|
|
Time & Date sync |
2.android.pool.ntp.org |
|
Network internet connectivity check |
google.com |
|
Software license management |
tem-terminals-eu02.icloud.ingenico.com |
|
Geolocation services |
https://xtrapath1.izatcloud.net/ctra3grc.bin https://xtrapath2.izatcloud.net/ctra3grc.bin https://xtrapath3.izatcloud.net/ctra3grc.bin https://info.izatcloud.net over Encrypted TCP time.xtracloud.net for time |
|
Firmware updates |
https://axyun.ingenicoaxcloud.net:8100 https://axyun.ingenico-axcloud.net:8101 |
|
TEM |
tem-terminals-eu02.icloud.ingenico.com |
Application
URL
Time & Date sync
2.android.pool.ntp.org
Network internet connectivity check
google.com
Software license management
tem-terminals-eu02.icloud.ingenico.com
Geolocation services
https://xtrapath1.izatcloud.net/ctra3grc.bin
https://xtrapath2.izatcloud.net/ctra3grc.bin
https://xtrapath3.izatcloud.net/ctra3grc.bin
https://info.izatcloud.net over Encrypted TCP
time.xtracloud.net for time
Firmware updates
https://axyun.ingenicoaxcloud.net:8100
https://axyun.ingenico-axcloud.net:8101
TEM
tem-terminals-eu02.icloud.ingenico.com
Ingenico DESK/5000 and MOVE/5000 - Mandatory applications
Till and terminal need to communicate together via six different ports (listed in the table on the next page) so you need to check that these are not blocked by firewall rules or any security and anti-virus software used on your till system.
|
Application |
URL |
IP Address Or End Point |
Port Number |
|---|---|---|---|
|
Ingenico TMS |
INGeTMS.elavon.com |
193.155.119.53 |
4001 |
|
Authorisation and settlement |
ipconex.elavon.com |
195.245.90.61 |
7601 |
Application
Ingenico TMS
URL
INGeTMS.elavon.com
IP Address Or End Point
193.155.119.53
195.245.90.103
Port Number
4001
Application
Authorisation and settlement
URL
ipconex.elavon.com
IP Address Or End Point
195.245.90.61
193.155.119.61
Port Number
7601
Poynt P5 and P61B - Mandatory applications
|
Application |
URL |
IP Address Or End Point |
Port Number |
|---|---|---|---|
|
Poynt HQ |
https://eu.poynt.net |
https://fouroneone.poynt.net
|
443 |
Application
Poynt HQ
URL
https://eu.poynt.net
IP Address Or End Point
https://fouroneone.poynt.net
https://services-eu.poynt.net
https://vt-eu.poynt.net
wss://pcm-eu.poynt.net
https://eu.poynt.net
https://mothership-eu.poynt.net
https://billing-eu.poynt.net
https://s3-eu-west-1.amazonaws.com
Port Number
443
Customisable applications (if relevant)
|
Application |
URL |
IP Address Or End Point |
Port Number |
|---|---|---|---|
|
Gift Card - Savvy TLS1.2, primary connection |
ssl9.tnsi.eu.com |
188.94.133.139 |
46328 & 45843 |
|
Gift Card - Savvy TLS1.2, secondary connection |
ssl9.tnsi.eu.com |
188.94.132.11 |
46328 & 45843 |
|
IHG (UK only) |
ssl12.tnsi.eu.com |
188.94.133.35 |
44396 |
|
Alternative Payment Methods: Alipay & WeChatPay |
https://transaction.pmg.elavongateway.com |
https://fouroneone.poynt.net |
|
Application
Gift Card - Savvy TLS1.2, primary connection
URL
ssl9.tnsi.eu.com
IP Address Or End Point
188.94.133.139
Port Number
46328 & 45843
Application
Gift Card - Savvy TLS1.2, secondary connection
URL
ssl9.tnsi.eu.com
IP Address Or End Point
188.94.132.11
Port Number
46328 & 45843
Application
IHG (UK only)
URL
ssl12.tnsi.eu.com
IP Address Or End Point
188.94.133.35
188.94.132.35
Port Number
44396
Application
Alternative Payment Methods: Alipay & WeChatPay
URL
https://transaction.pmg.elavongateway.com
IP Address Or End Point
https://fouroneone.poynt.net
https://services-eu.poynt.net
https://vt-eu.poynt.net
wss://pcm-eu.poynt.net
https://eu.poynt.net
https://mothership-eu.poynt.net
https://billing-eu.poynt.net
https://s3-eu-west-1.amazonaws.com
Port Number
Smartlink integrations
|
Terminal |
What Do I Need? |
|
|
|---|---|---|---|
|
Printing |
Terminal initiated |
Network specific |
5187 |
|
Till initiated |
Till initiated |
Network specific |
5188 |
|
GetPedState |
Till initiated |
Network specific |
5189 |
|
Events |
Network specific |
Network specific |
5190 |
|
DoSettlement |
Till initiated |
Network specific |
5191 |
|
DoMobileTopUpSettlement |
Till initiated |
Network specific |
5192 |
Terminal
Printing
What Do I Need?
Terminal initiated
Network specific
5187
Terminal
Till initiated
What Do I Need?
Till initiated
Network specific
5188
Terminal
GetPedState
What Do I Need?
Till initiated
Network specific
5189
Terminal
Events
What Do I Need?
Network specific
Network specific
5190
Terminal
DoSettlement
What Do I Need?
Till initiated
Network specific
5191
Terminal
DoMobileTopUpSettlement
What Do I Need?
Till initiated
Network specific
5192
Ingenico - An at-a-glance guide to managing your terminal
If you experience minor problems with your terminal it’s good to know that you have the answers to hand. This overview of messages and available options with description and instructions will help you to resolve most technical problems in minutes.
Messages
|
|
|
|---|---|
|
Message: |
Referral B, Call Auth Centre |
|
Solution: |
Please call Authorization Centre on: |
Message:
Referral B, Call Auth Centre
Solution:
Please call Authorization Centre on:
UK 0345 850 0197
ROI 1850 30 31 30
To obtain an authorization code that will allow you to perform Force transaction on the terminal.
|
|
|
|---|---|
|
Message: |
Transaction Declined |
|
Solution: |
This is a genuine message from the Bank. Please ask your customer to consider other forms of payment. If the customer is concerned please refer them to their card issuer (the Bank). Please note that when the card has reached its limit, then transactions can also decline. |
Message:
Transaction Declined
Solution:
This is a genuine message from the Bank. Please ask your customer to consider other forms of payment. If the customer is concerned please refer them to their card issuer (the Bank). Please note that when the card has reached its limit, then transactions can also decline.
|
|
|
|---|---|
|
Message: |
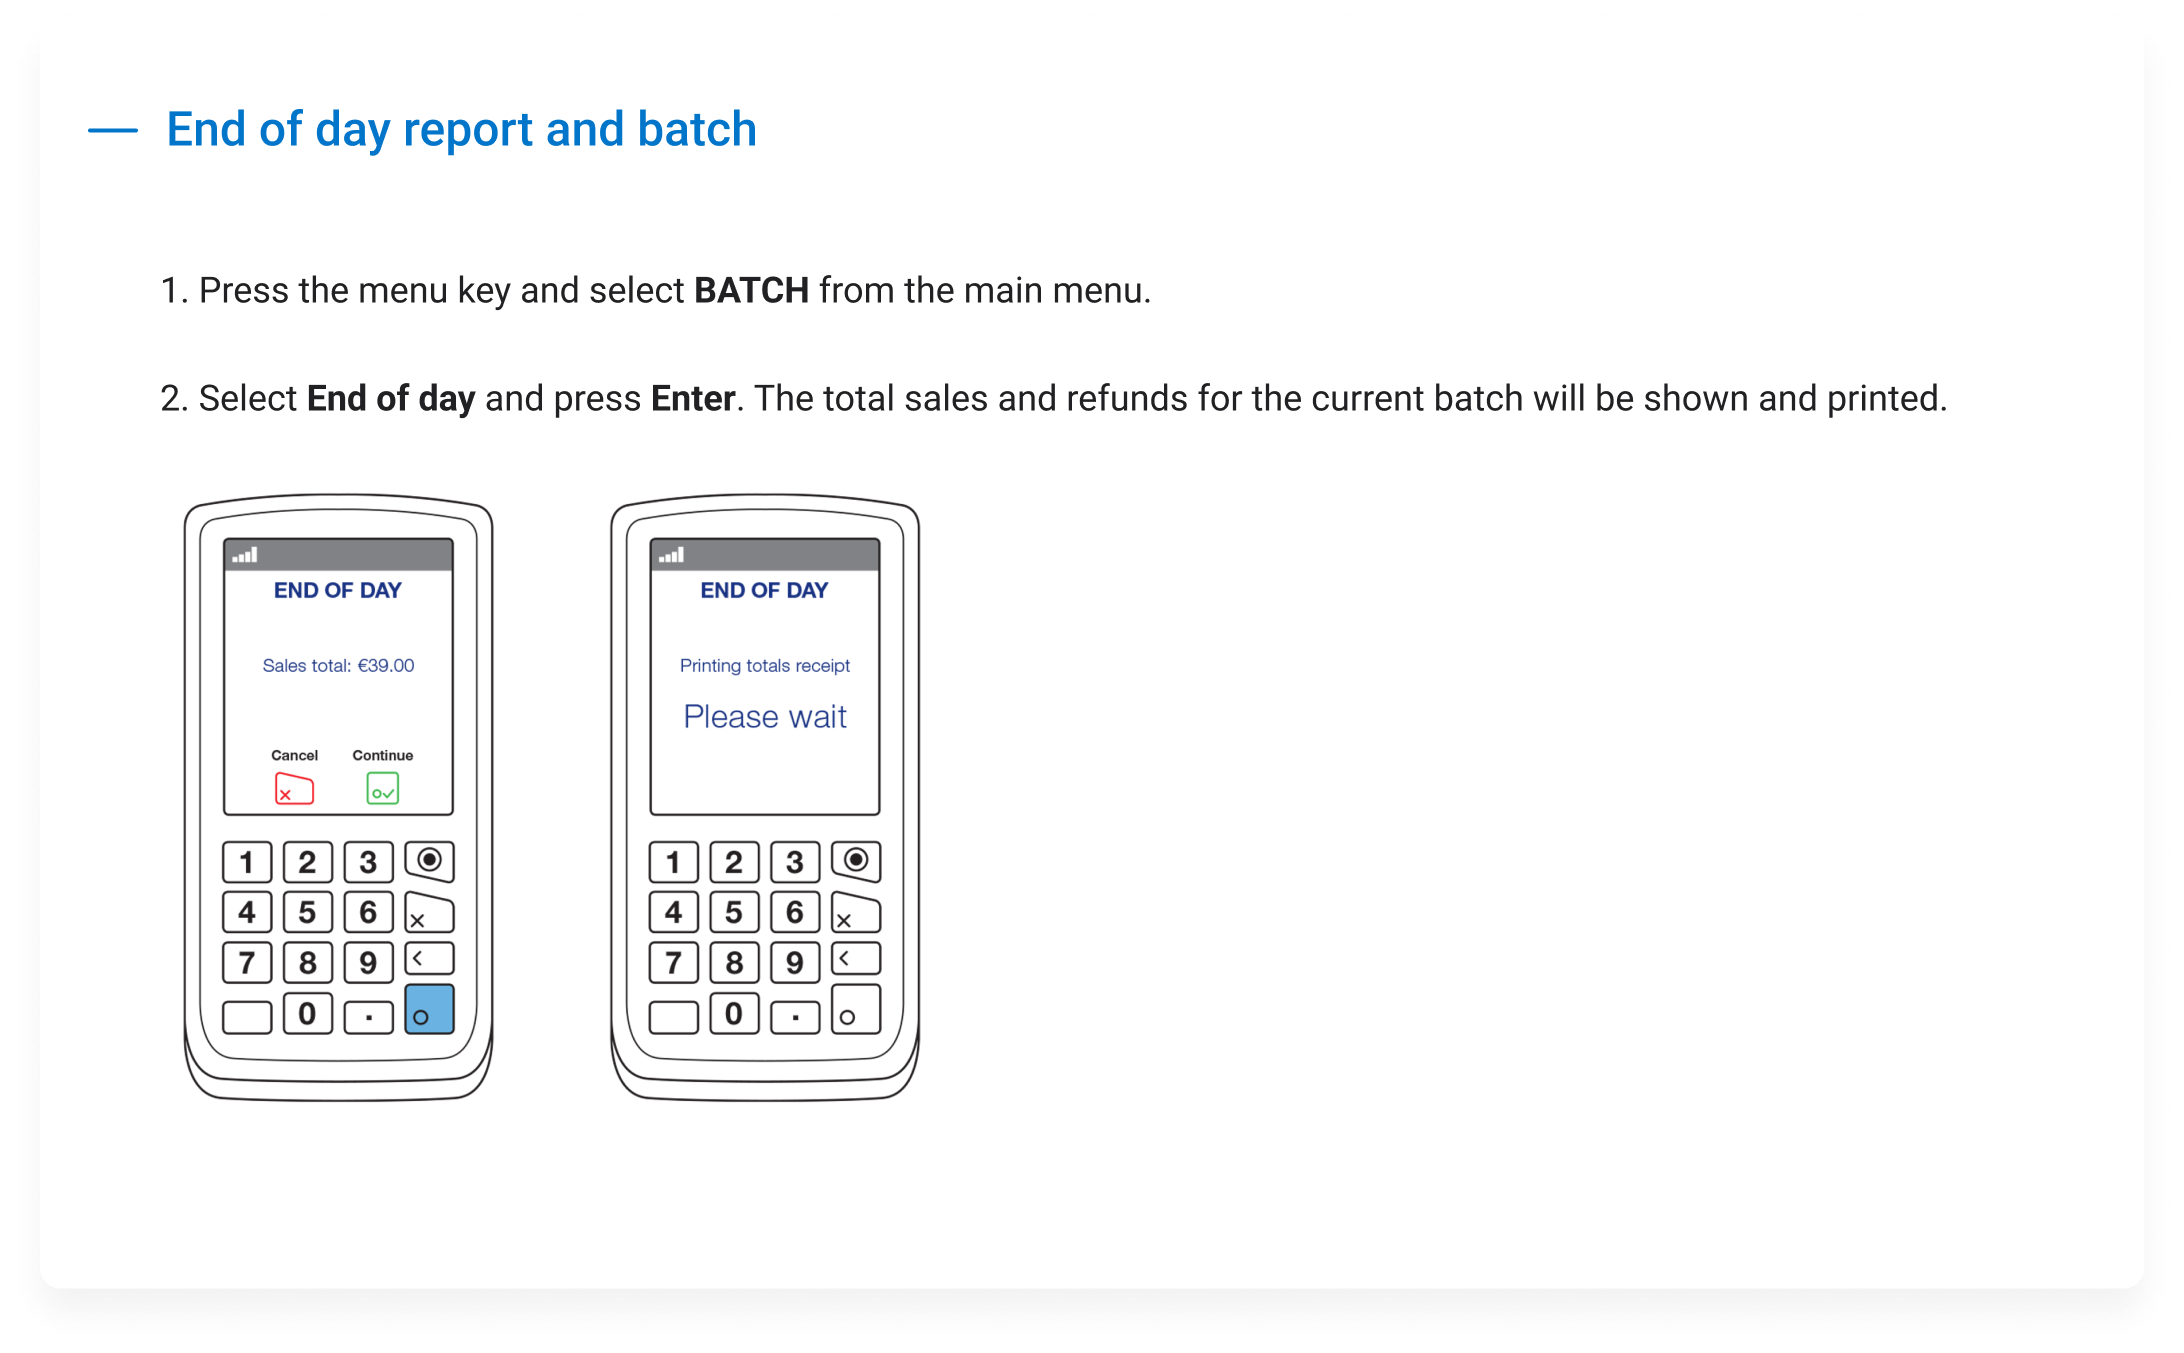
Batch Not Empty. Please Batch Off |
|
Solution: |
Please send Batch manually from the terminal. |
|
How? |
> F > Batch > End of Day |
Message:
Batch Not Empty. Please Batch Off
Solution:
Please send Batch manually from the terminal.
How?
> F > Batch > End of Day
|
|
|
|---|---|
|
Message: |
Copy of Last End Of Day banking (Saved EOD) |
|
Solution: |
You can re-print your last successful End of Day report via the Reports menu. |
|
How? |
> F > Reports > Saved EOD (NB: The terminal may ask for the user password) |
Message:
Copy of Last End Of Day banking (Saved EOD)
Solution:
You can re-print your last successful End of Day report via the Reports menu.
How?
> F > Reports > Saved EOD (NB: The terminal may ask for the user password)
|
|
|
|---|---|
|
Message: |
Connection Failure (terminal connecting via GPRS network) |
|
Solution: |
if the GPRS/3G terminal is failing to connect please turn the terminal OFF by holding ’Yellow’ and ‘Dot’ keys together. To power back on press ’Green’ button. |
|
How? |
> F > Terminal > Terminal Config > ’Green’ on the Profile number screen > Edit GPRS Network? > YES > Edit > Automatic Registration? > YES |
Message:
Connection Failure (terminal connecting via GPRS network)
Solution:
if the GPRS/3G terminal is failing to connect please turn the terminal OFF by holding ’Yellow’ and ‘Dot’ keys together. To power back on press ’Green’ button.
How?
> F > Terminal > Terminal Config > ’Green’ on the Profile number screen > Edit GPRS Network? > YES > Edit > Automatic Registration? > YES
|
|
|
|---|---|
|
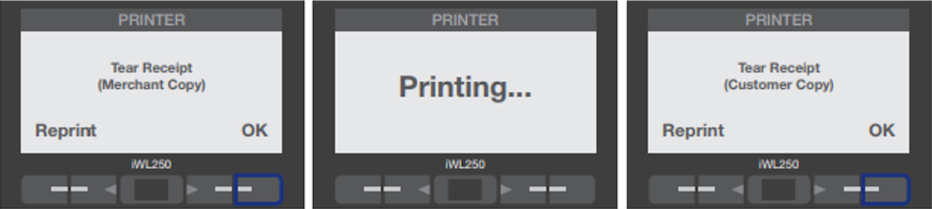
Message: |
Terminal keeps printing last receipt |
|
Solution: |
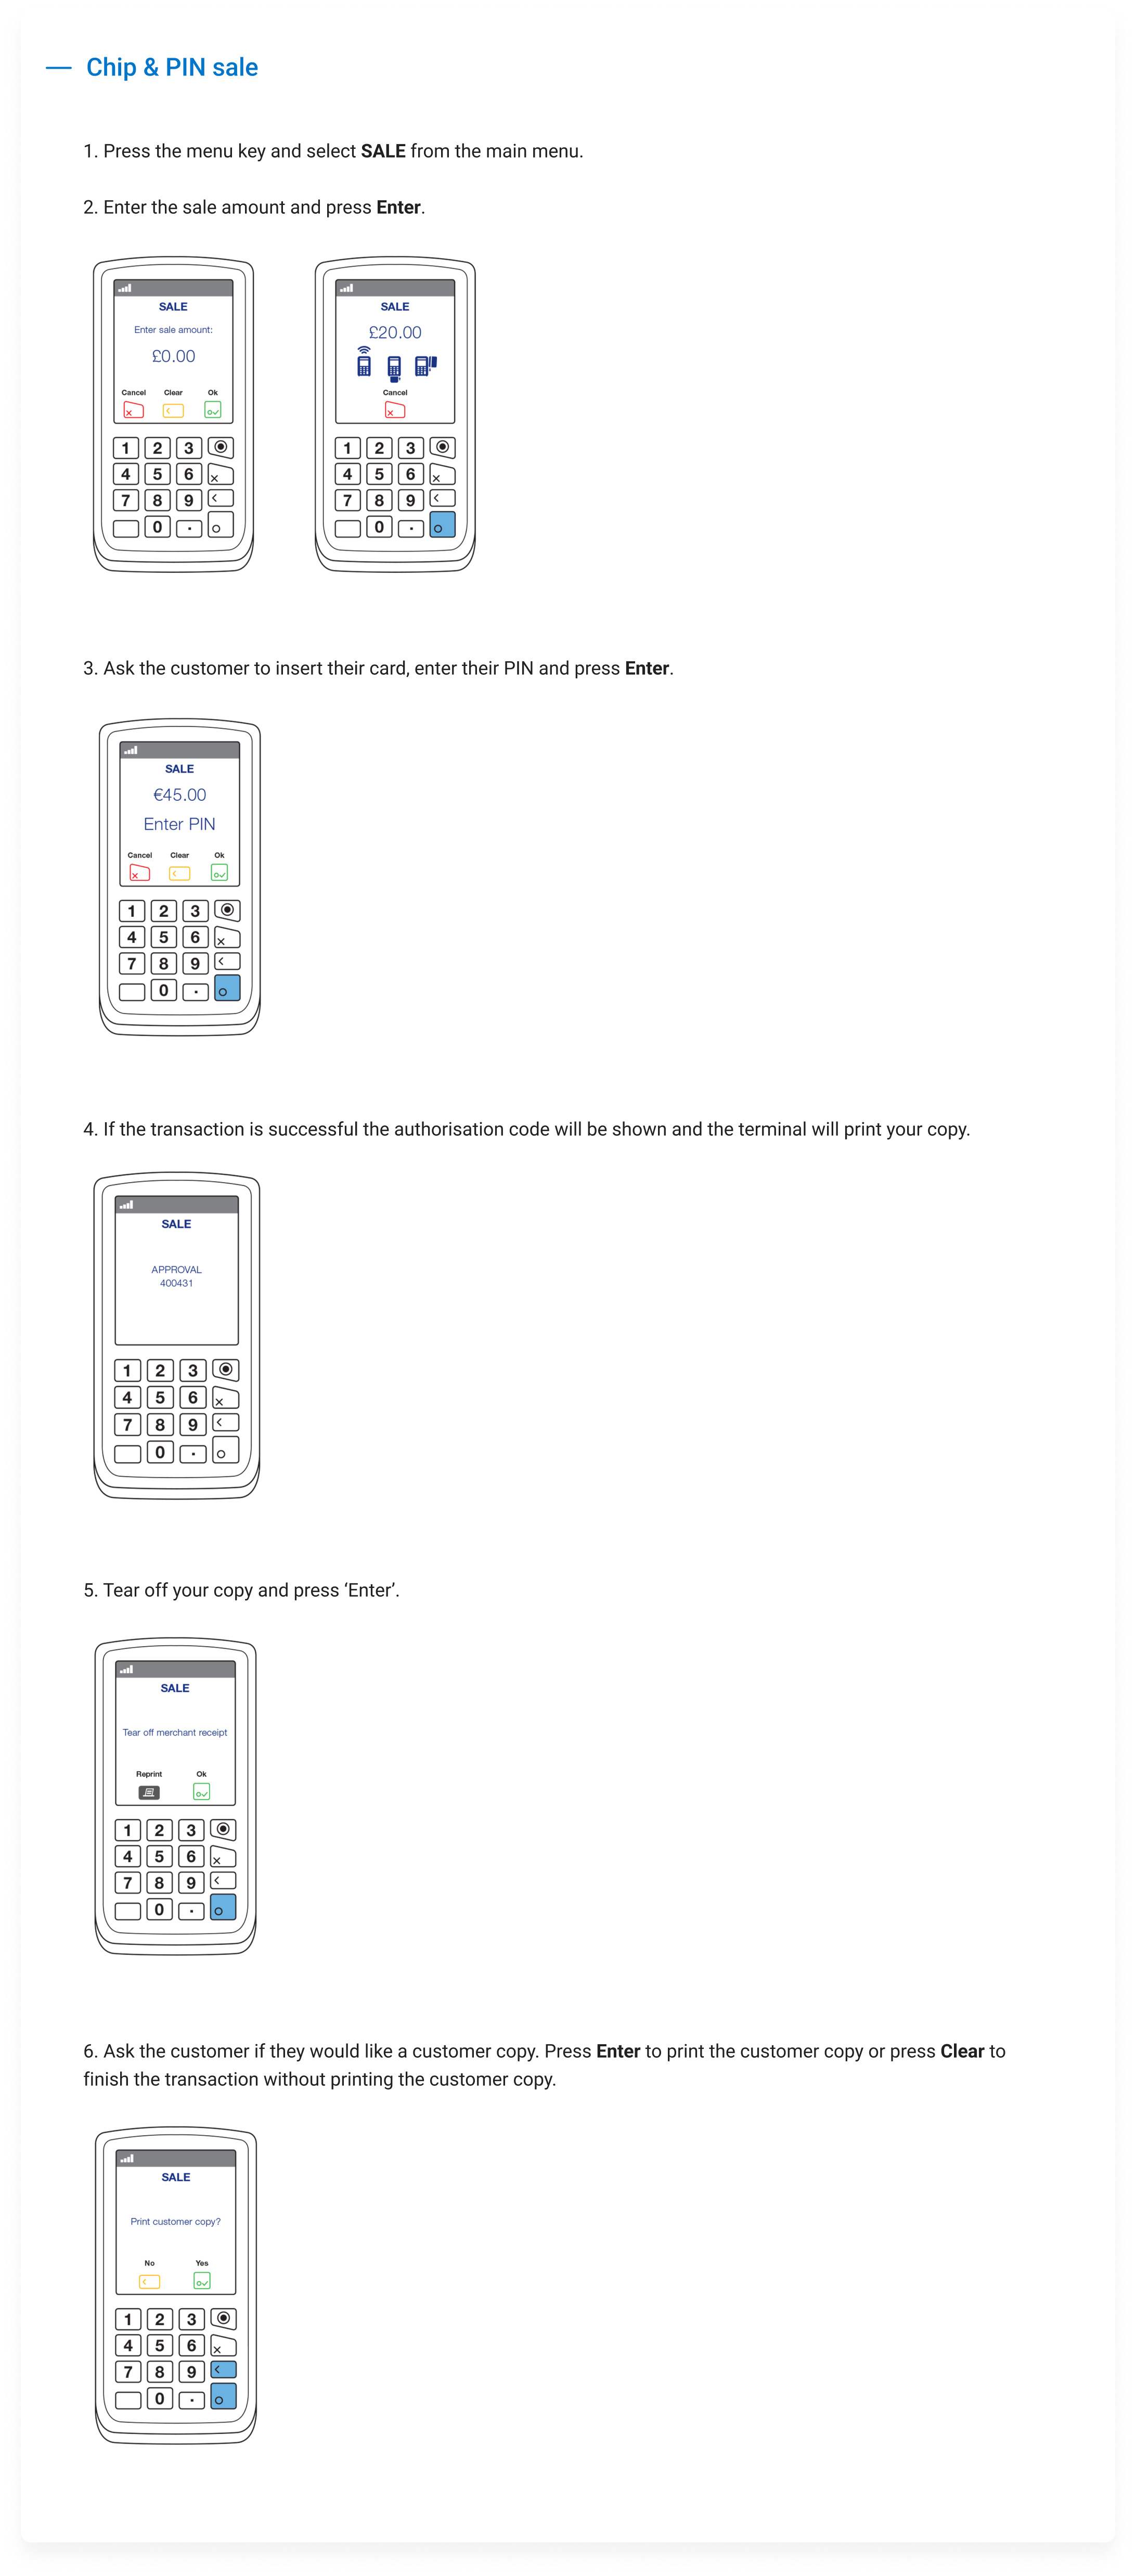
When the transaction is authorized, the terminal will print Merchant and Customer receipt. After each copy, the terminal will give you an option to Reprint or press OK on the bottom of the screen. If the receipt is clear and correct please select OK by pressing button just under the screen as outlined below: |
Message:
Terminal keeps printing last receipt
Solution:
When the transaction is authorized, the terminal will print Merchant and Customer receipt. After each copy, the terminal will give you an option to Reprint or press OK on the bottom of the screen. If the receipt is clear and correct please select OK by pressing button just under the screen as outlined below:
Procedure
Pre-Authorization Procedure
(NB: This function is only available for some business types, such as hotels, car rentals and cruise liners.)
Below you can find an overview of options available if you have a pre-authorization functionality enabled on your terminal.
|
|
|
|---|---|
|
Pre-Authorization Transaction (Check In): |
> F > Pre-authorization > Swipe, Key or Insert Card > If Card Keyed terminal will ask for Expiry > Date > Customer is Present? > If not CVV Number is... > Pre-authorized Amount |
Pre-Authorization Transaction (Check In):
How?
> F > Pre-authorization > Swipe, Key or Insert Card > If Card Keyed terminal will ask for Expiry > Date > Customer is Present? > If not CVV Number is... > Pre-authorized Amount
|
|
|
|---|---|
|
Completion (Check In): |
> F > Completion > Swipe, Key or Insert Card > Is your customer present? > If not CVV2 Number is... > Completion Amount > Enter Host Reference No (from the Pre-authorization receipt) If the Completion is not done within timescale the funds will be released back to the cardholder. |
Completion (Check In):
How?
> F > Completion > Swipe, Key or Insert Card > Is your customer present? > If not CVV2 Number is... > Completion Amount > Enter Host Reference No (from the Pre-authorization receipt) If the Completion is not done within timescale the funds will be released back to the cardholder.
|
|
|
|---|---|
|
Pre-Authorization Reversal (Cancelling Pre-authorization): |
> F > Pre-authorization Reversal > Swipe, Key or Insert Card > If the Card is Keyed, the terminal will ask for an Expiry Date > Customer is Present? > If not CVV Number is... > Pre-authorized Amount > Enter Host Reference No (from the Pre-authorization receipt) |
Pre-Authorization Reversal (Cancelling Pre-authorization):
How?
> F > Pre-authorization Reversal > Swipe, Key or Insert Card > If the Card is Keyed, the terminal will ask for an Expiry Date > Customer is Present? > If not CVV Number is... > Pre-authorized Amount > Enter Host Reference No (from the Pre-authorization receipt)
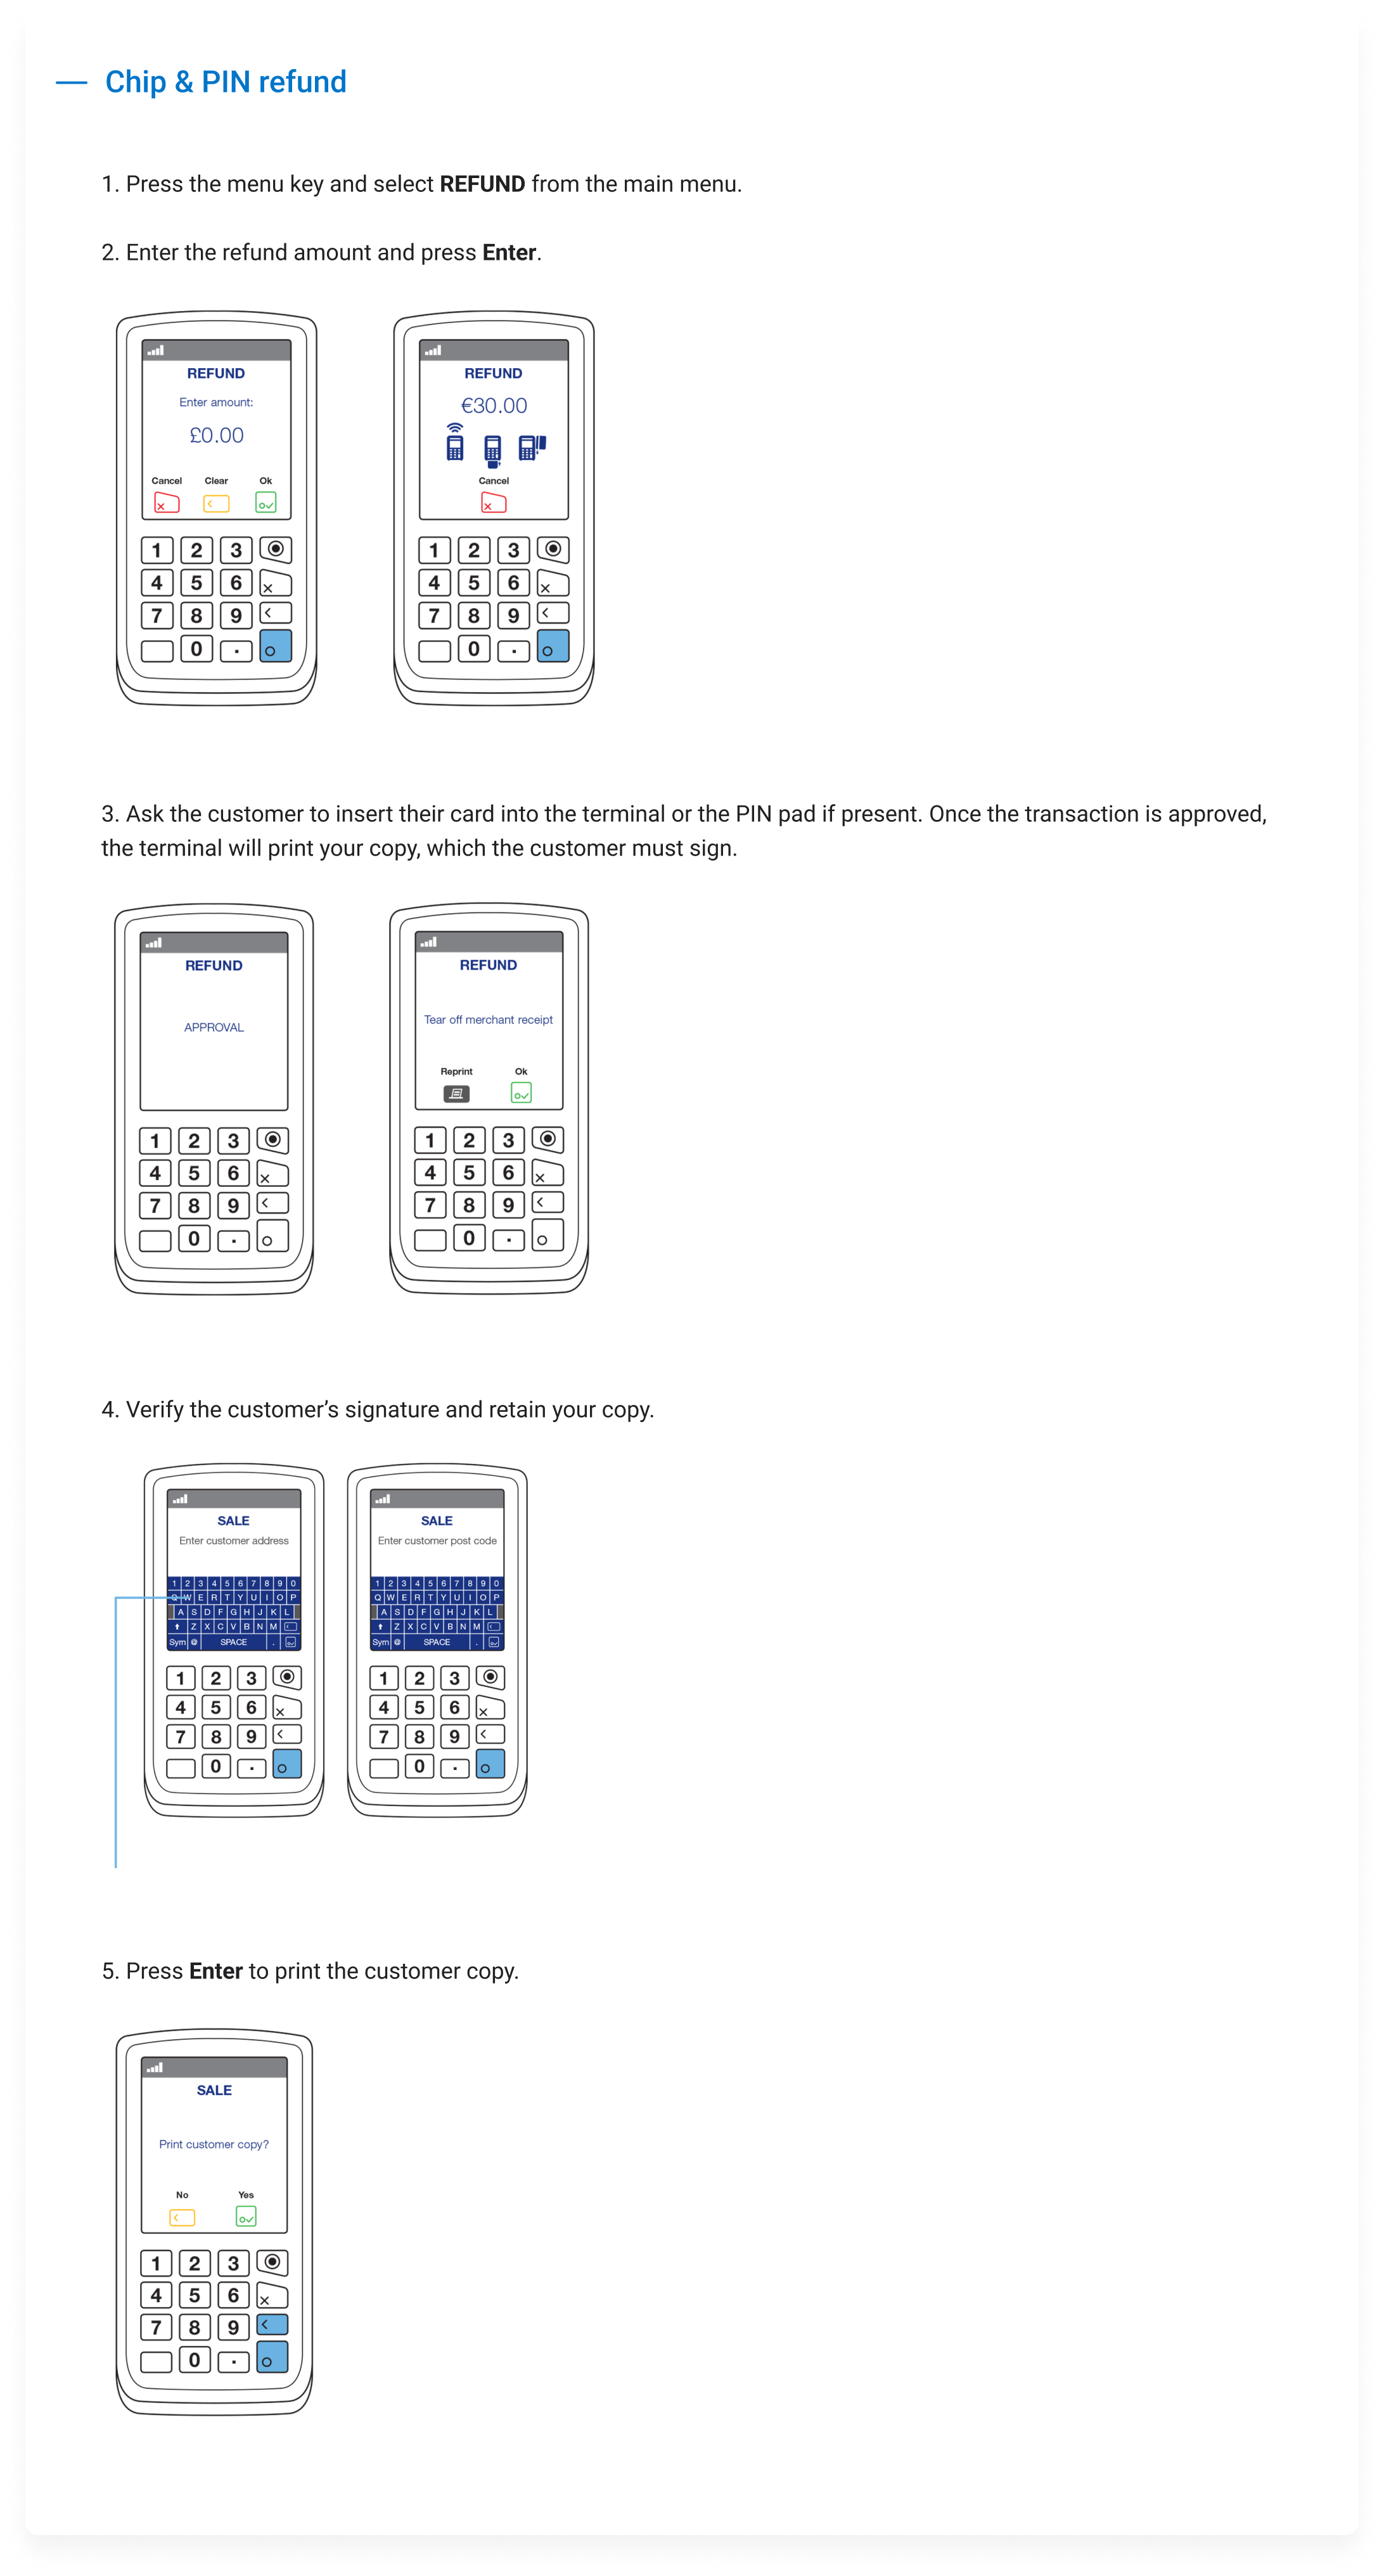
Refund Procedure
(NB: This function may not be available or it could be password protected depending upon the terms of your agreement with Elavon)
A refund should only be processed if the original transaction was already batched from your terminal. Please note that refunds can ONLY be done on the same card that was originally charged. We kindly ask you to always confirm with the customer that the refund is processed on the same card. Refunds are processed in the same way as a standard sale is processed. The cardholder will see the funds within 3-10 working days – although this depends on their issuing Bank.
|
|
|
|---|---|
|
Customer Present |
> F > Refund > Enter amount > Insert card > Enter your PASSWORD (if applicable) > Terminal will connect to process refund |
Customer Present
How?
> F > Refund > Enter amount > Insert card > Enter your PASSWORD (if applicable) > Terminal will connect to process refund
|
|
|
|---|---|
|
Customer Not Present |
> F > Refund > Enter amount > Key in the card number > Enter your PASSWORD (if applicable) > Insert expiry date on the card > Customer present > Select No > Terminal will connect to process refund |
Customer Not Present
How?
> F > Refund > Enter amount > Key in the card number > Enter your PASSWORD (if applicable) > Insert expiry date on the card > Customer present > Select No > Terminal will connect to process refund
Void Procedure
(NB: This function may not be available or it could be password protected depending upon the terms of your agreement with Elavon)
The void option can be used when a transaction is still pending in the current batch (End of Day report was not yet sent). Please note that the cardholder will see the funds as blocked on the account however their Bank will release the block usually within 24h – this depends on the Bank.
|
|
|
|---|---|
|
Customer Not Present |
> F > Void > Enter your PASSWORD > Enter the INVOICE NUMBER from the original transaction receipt > Confirm the amount to be voided |
Customer Not Present
How?
> F > Void > Enter your PASSWORD > Enter the INVOICE NUMBER from the original transaction receipt > Confirm the amount to be voided

These instructions are only applicable for Elavon provided Ingenico Point of Sale (POS) devices. Other vendors may have different process flows for the equivalent transaction type.
- Press the F key to invoke the payment on a Telium 2 device/press the silver key on Tetra select MOTO SALE and enter the Card number into the terminal
- Enter the Card expiry date and press Enter
- Enter the security code (this is the CVV2 number)
- If no CVV2 number available press ‘Enter’ and proceed to step 3
- If it is a UK profile, the terminal will prompt for Address Verification - Indicate if the CVV2 number is:
- Not Present – if selected, enter AVS details and press Enter
- Present – enter CVV2 and press Enter, then enter AVS details
- Illegible – if selected, terminal will prompt for AVS details
- Absent – if selected, terminal will prompt for AVS details - Enter the Sale amount and press Enter, select cardholder currency or merchant currency if prompted for DCC
- Select Enter or OK for AVS response displayed on screen
- Remove merchant copy receipt by tearing
- Press Enter
- Remove cardholder copy receipt by tearing
NOTE: AVS available on UK profiles only
If the profile is set up as MOTO the MOTO sale will be available in main menu. If it is setup as different profile type (retail or Restaurant) the MOTO sale can be found in the New Trans menu.
Terminal pre-requisite checklist
Merchant operating guide
Ingenico Desk 5000 quick start guide
Ingenico Move 5000 quick start guide
Elavon Terms of Service Ireland
Elavon Terms of Service French
Elavon Terms of Service Spanish
Elavon Terms of Service Dutch
Helping thousands of customers around the world grow their business through payments
Customer service and support
We’re here to help!
Customer service: 0818 20 21 20
8am to 6pm, Monday to Friday
Elavon technical support: 0818 30 31 30
24 hours a day, 365 days a year
Opayo product support: 01 240 8731
24 hours a day, 365 days a year
Copyright© 2024 | Elavon Financial Services DAC. Registered in Ireland – Number 418442.
Registered Office: Block F1, Cherrywood Business Park, Dublin 18, D18 W2X7, Ireland. Elavon Financial Services DAC, trading as Elavon Merchant Services, is regulated by the Central Bank of Ireland.
Helping thousands of customers around the world grow their business through payments
Customer service and support
We’re here to help!
Customer service: 0818 20 21 20
8am to 6pm, Monday to Friday
Elavon technical support: 0818 30 31 30
24 hours a day, 365 days a year
Opayo product support: 01 240 8731
24 hours a day, 365 days a year


Copyright© 2024 | Elavon Financial Services DAC. Registered in Ireland – Number 418442.
Registered Office: Block F1, Cherrywood Business Park, Dublin 18, D18 W2X7, Ireland. Elavon Financial Services DAC, trading as Elavon Merchant Services, is regulated by the Central Bank of Ireland.