

Search our help centre
Welcome to mobile solutions
If your business is on the move MobileMerchant is the ideal solution for you. This is ideal if you are an independent trader in the health and beauty, food service, garden centres, home furnishing supplier or taxi service sectors. You can accept credit and debit card payments anywhere, anytime with this easy-to-use and secure product.
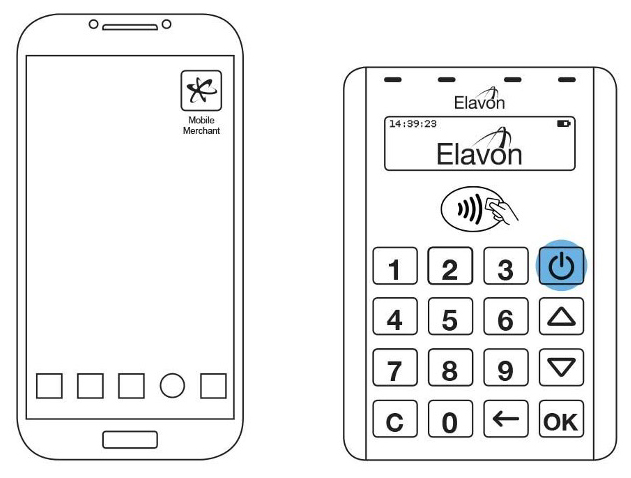
MobileMerchant turns your Smartphone or tablet into a mobile payment terminal.
MobileMerchant provides full security and support for Chip and PIN cards, magnetic stripe cards, contactless and card-not-present transactions.
Cardholder data is securely captured and encrypted using a Bluetooth connected PIN pad, ensuring that no information is captured and stored by the smart device.
Provide a professional customer experience with a faster method for closing sales. Reduce cash handling and keep your personal and business income and expenses separate. Put MobileMerchant into the hands of your sales team, you put the power to increase cash flow in their hands, too.
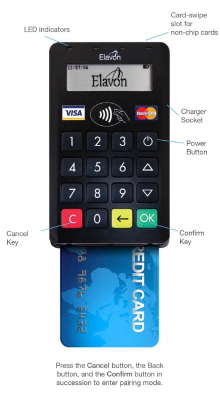
1. Power on the smartphone and Datecs PIN Pad.
NOTE: Bluetooth must be enabled on the smartphone.
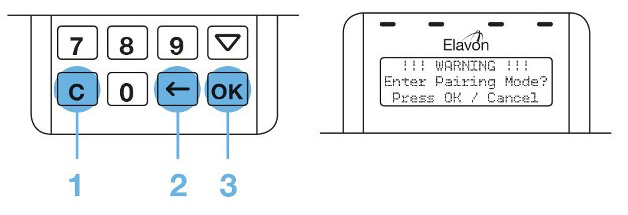
2. Put the PIN Pad in pairing mode, by rapidly pressing the red Cancel button, the yellow Back button, and the green OK button in the sequence shown.*
Your PIN Pad will request permission to enter pairing mode. Press OK to proceed.
*Alternatively you can also press all three coloured buttons at the same time to switch to pairing mode.
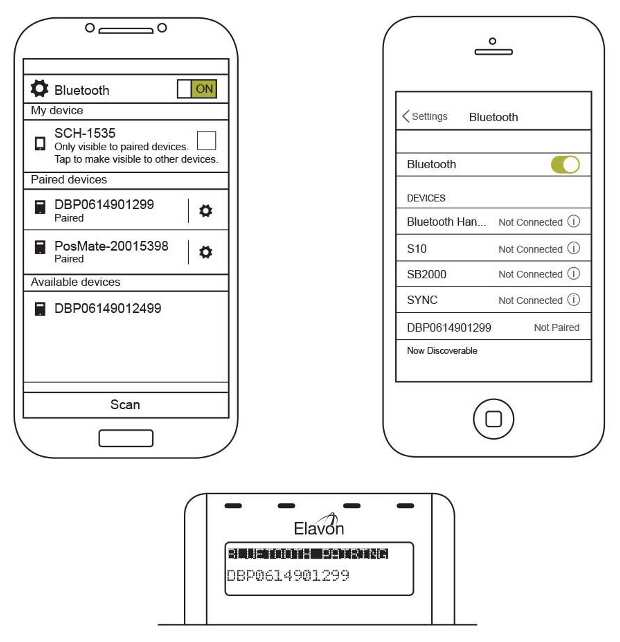
3. Once you’ve entered pairing mode, you will see a Bluetooth device name appear on the PIN Pad. Check your smartphone, and locate this device name in your Bluetooth menu.
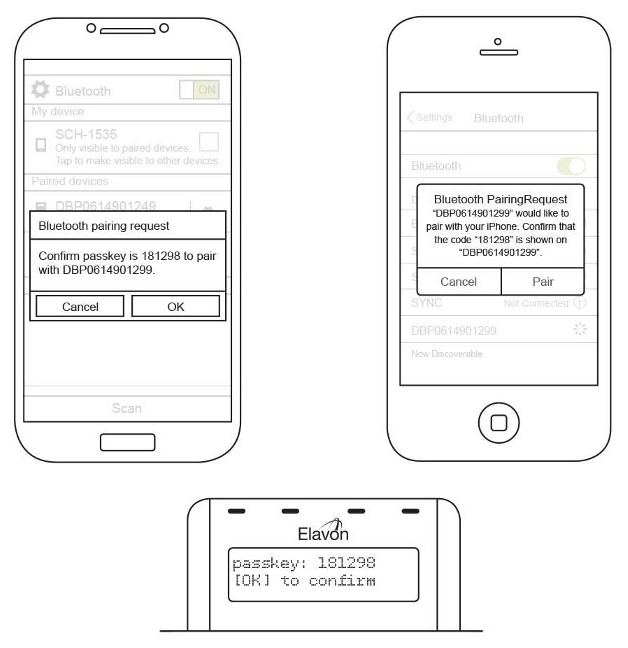
4. Select the correct device and a message will prompt you to confirm pairing. Once you have confirmed the device will pair with your smartphone.
5. Your devices are now paired together and ready to start a transaction.

1.Download MobileMerchant from your Applications store.
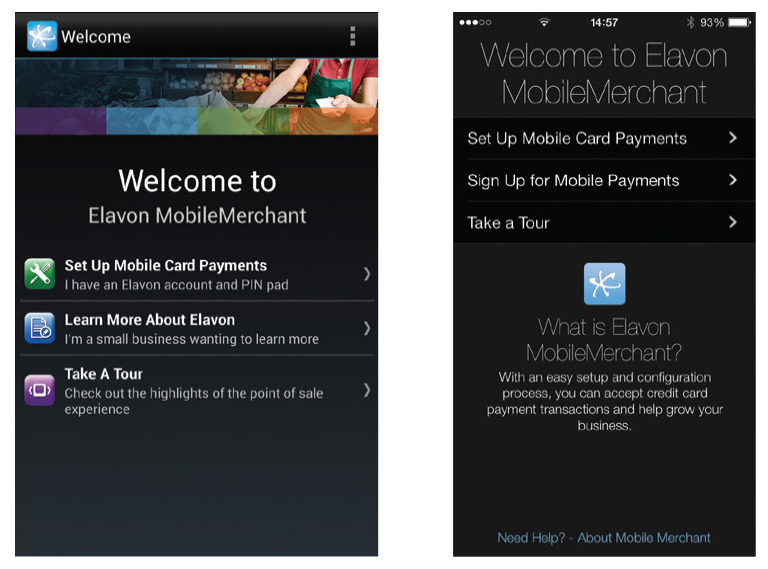
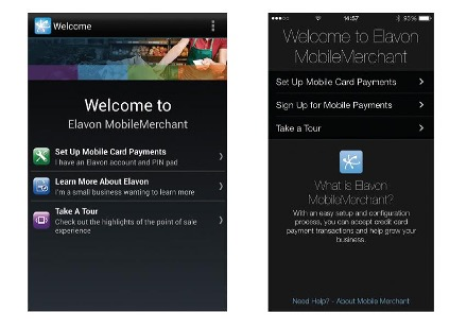
2. Start the app, and the welcome screen will appear. You can take a tour, or start the setup process.
3. Enter a 5-digit personal identification number (PIN). This will protect your app.

4. Confirm that a PIN Pad is paired with your device. (Please ensure you have followed the instructions above).

5. Sign in with your terminal credentials, which you have received in your welcome email from Elavon. Your Business Name will show if this is successful.
6. Sign in with your MobileMerchant portal credentials, which you will also find in your welcome email from Elavon.
7. You should now see the finish screen, and you are ready for your first transaction.
1.1 How does it work?
Mobilemerchant uses an app on your smart device, such as iPhone, iPad or Android smartphones, to process credit and debit card transactions, in conjunction with a small PIN Pad, which is linked using secured Bluetooth wireless technology. It’s this simple:
- You enter the amount you wish to charge your customer into the app.
- Your customer inserts their card into the PIN Pad and authenticates the transactions using their PIN, just like they would with any other POS terminal.
- Your smart device then connects to Elavon via the internet to get authorisation for the transaction.
The whole process should only take a maximum of 30 seconds and is fully secure. As far as your customer is concerned it’s exactly the same process as paying for something in a shop. The Mobilemerchant App is simple to install on your smartphone or tablet and this guide will help get you up and running as quickly as possible
1.2 What do I need?
In order to process live card transactions, you’ll need to arrange the following:
A smart mobile device [1] a. Android Smartphone OS 4.1.1 (or greater) b. iPhone/iPod OS 6.0 (or greater)
A merchant account with Elavon. To set up an account, visit us at www.elavon.co.uk or www.elavon.ie and select the Merchant Services tab.
Purchase a Datecs BluePad-50 PIN Pad from Elavon.
Download and configure the Mobilemerchant App from the App Store or Google Play™.
NOTE: Rooted/jailbroken devices are not supported as Elavon ensures the highest level of security when processing a transaction.
1.3 How to get in touch
We are always on hand if you need to contact us. You might find it helpful to record the following information below when configuring the MobileMerchant App and if contacting Elavon Customer Services.
- Mobilemerchant Portal User ID
- Mobilemerchant Portal Password
- Terminal ID
- Transaction Key
2.1 Introduction
The Datecs BluePad-50 PIN Pad attaches wirelessly to all supported smartphones.
2.2 Charging
The Datecs BluePad-50 PIN Pad has its own internal battery, which needs to be charged before use. It can be charged from 3 sources:
- Using the USB lead and the mains charger.
- Using the USB connected to a computer.
- Using the car charger.
When the charger is connected, the charging and power symbols will appear on the PIN Pad screen. The charging icon will disappear when fully charged. It can take up to 6 hours to go from zero battery life to fully charged. When connected to a USB port, the USB connection symbol will appear on the screen. The PIN Pad can be used while the battery is being charged, and the power connected icon, a small plug symbol, will flash on the LCD: A battery icon on the display shows the state of the battery.
NOTE: Never use any other charger than the one supplied with the PIN Pad to avoid any damage.
The following will guide you through pairing your PIN Pad, installing the MobileMerchant App and configuring the app to take payment.
3.1 Pairing PIN Pad devices
The following will guide you through pairing your PIN Pad, installing the MobileMerchant App and configuring the app to take payment.
3.1.1 Pair the PIN Pad with the mobile device
Prior to installing the app, pair the PIN Pad with the mobile device. Pairing is the process of connecting your mobile device to your PIN Pad using Bluetooth communication.
- Go to the Bluetooth settings on the mobile phone or tablet device and enable Bluetooth
- Power-on the PIN Pad
- On the mobile device, select the Scan option to search for other Bluetooth devices
If you have a visibility time-out on your device (indicated by a countdown being present on the Bluetooth screen) you will need to turn this off on your device in order to pair with the PIN Pad.
3.1.2 Pairing the Datecs BluePad-50 PIN Pad
1. Press the 1, 2, 3 buttons in succession to enter pairing mode.
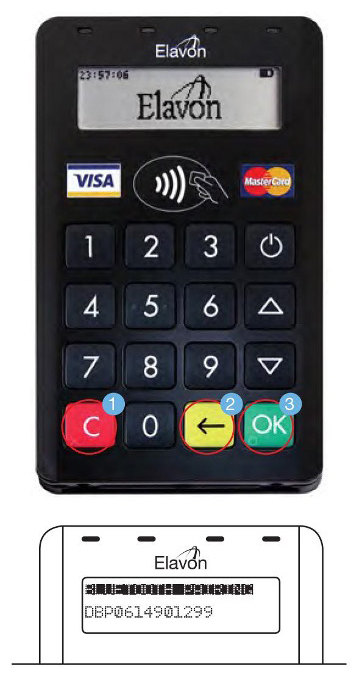
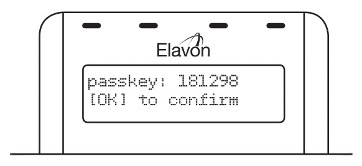
2. Select the device name from your mobile device. The Datecs BluePad-50 PIN Pad will ask you to confirm that the passkey on the PIN Pad is the same as your mobile device. If they match, select OK. The Datecs BluePad-50 PIN Pad attaches wirelessly to all supported smartphones.
3. The PIN Pad will now be paired with the mobile device.
3.2 Install the MobileMerchant app
With the PIN Pad successfully paired, install the MobileMerchant App on the mobile device from either the App Store or Google Play™.
Simply go to the relevant app store on your mobile phone or tablet, search for “Elavon” and you should find the Elavon MobileMerchant App.
Prior to launching the app, ensure you have the following information available for first-time configuration.
This information will be given to you after setting up an Elavon merchant account:
- MobileMerchant Portal Username/Email
- MobileMerchant Portal Temporary Password (please log in to MobileMerchant Portal and change your password prior to launching the app)
- Terminal ID
- Transaction Key Please check your welcome emails from Elavon for the above information.
NOTE: If for any reason the app set up is interrupted before completion (i.e. app is terminated), the set up process will start over from the beginning.
3.2.1 First time use
With the information listed in section 4.2, the following process will set up your MobileMerchant account. Taking a tour will show you all the nuances of the MobileMerchant App.
1. Launch the MobileMerchant App The first screen displayed is the First-time Use welcome screen. Select the Set Up Mobile Card Payments option and proceed as follows.
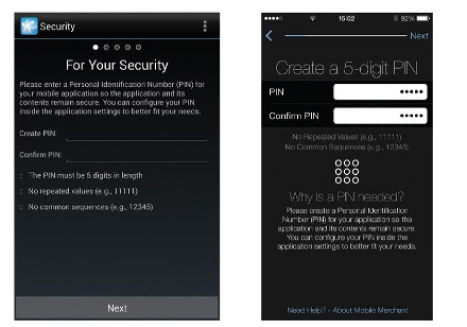
2. Create your secure PIN The security screen prompts for creation of a PIN code to lock and protect the app. Please consider the following requirements when selecting a PIN:
- PIN must be exactly 5 digits in length
- Repeated values are not allowed (e.g., 11111)
- Common sequences are not allowed (e.g., 12345)
NOTE: Please remember the PIN code configured on this screen.
Upon completion press the Next button.
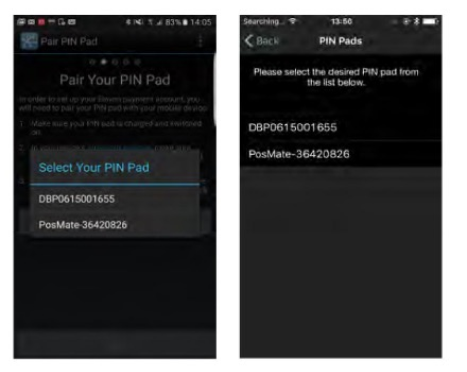
3. Select your PIN Pad If you have not already paired your PIN Pad to your mobile device, please do so now. See Section 3.1.2 Pairing the Datecs BluePad-50 PIN Pad for help. Once the PIN Pad has been paired, press the Confirm Pairing for Android or Test Connection for iPhone button on the screen. If successful, you will see the name of your PIN Pad appear in green on the screen. At this point, press the Next button.
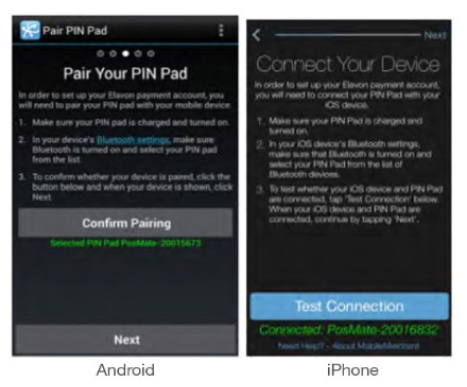
If you have another PIN Pad paired to your mobile device, you may leave it as it is or choose to remove it from the device’s Bluetooth settings. During the app set up process, if multiple PIN Pads are found, you will be prompted to choose one for processing transactions.
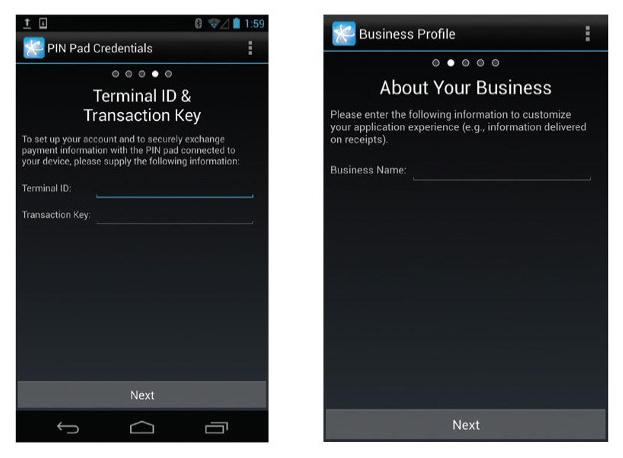
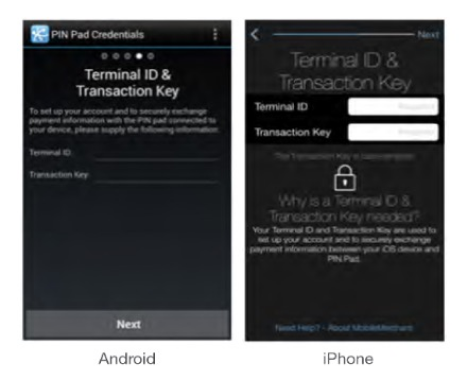
4. Provide Terminal ID and Transaction Key For this section, you will need:
- Your Terminal ID
- Your Transaction Key
You will have received both of these pieces of information in your welcome email. Once they have been entered into the appropriate fields press Next. You will need internet connection during this part of the app set up.
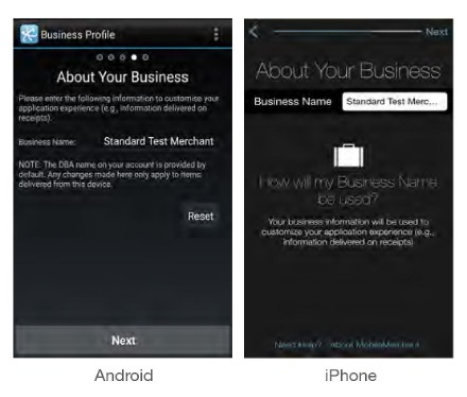
5. Verify your business name
Your business name will be populated based on the information you provided to Elavon. Verify the name is as you wish it to appear on your receipts, press Next.
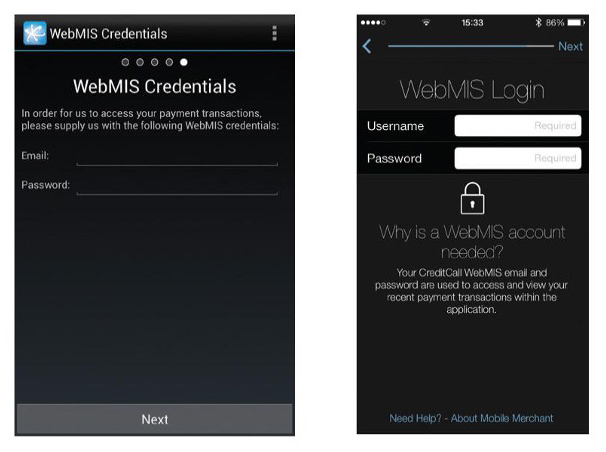
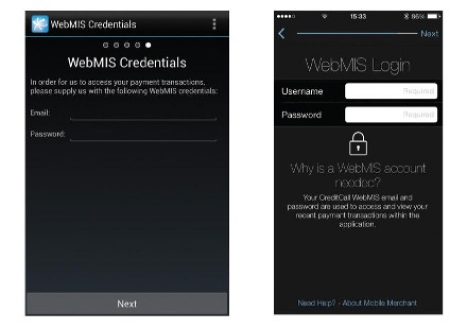
6. Provide your MobileMerchant Portal credentials
At this point, you will need the following information:
- MobileMerchant Portal Username/Email
- MobileMerchant Portal Password
These are the same sign in details you use to log in to mobilemerchant.elavon.com. You will need internet connection during this part of the app set up.
Note: If you are a new customer and you have not yet enabled your MobileMerchant Portal (WebMIS) access by resetting the password online, or if you are an existing customer and have exceeded the 90-day password reset deadline, you will need to reset/change your password now.
Simply:
- Open the web browser on your phone or other device
- Go to mobilemerchant.elavon.com
- Login using the MobileMerchant Portal username that is listed in your first welcome email
- Enter the temporary MobileMerchant Portal password that is listed in your second welcome email – Then follow the instructions to create a new Password
Enter your MobileMerchant Portal username/email and MobileMerchant Portal password into the page and press the Next button. The mobile device will go online to verify the entered values. If all is successful, the mobile device will proceed to the next screen.
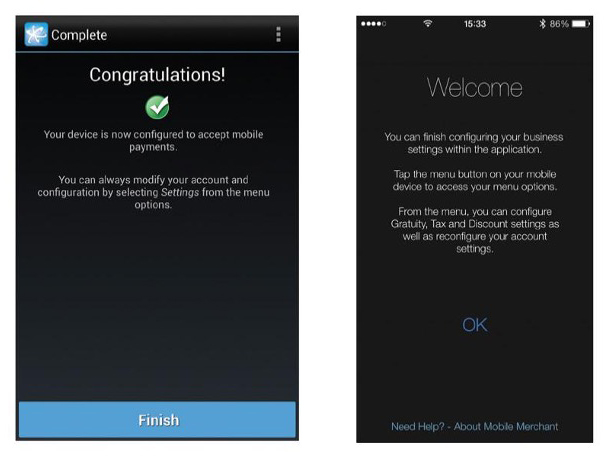
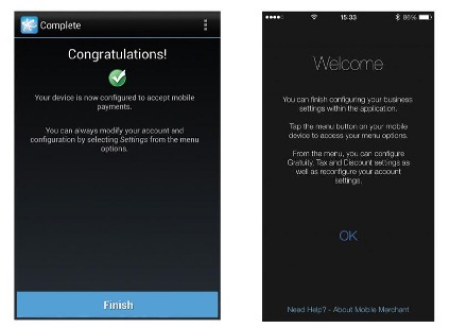
7. Complete
At this point, the app is successfully configured and ready to take payments. Press the Finish or OK button
3.3 Additional configurations
There are a variety of options available to help you take mobile payments. At any point, press the Menu button in the top right, and select Settings to adjust the app settings. The following options may be configured. Note: these settings are optional and not required for use.
3.3.1 Tax
Enable Value Added Tax (VAT). The tax methodology is tax-inclusive pricing, so the tax rate is included with the sale.
3.3.2 Gratuity/Tip
Enable this feature to optionally allow for the entry of gratuity/tip amount to a transaction. Gratuity/tip amount can be configured in either a whole number or percentage amount.
3.3.3 Discount
Enable to optionally apply a discount amount on a transaction. The discount amount is applied to the order total. Additionally, the discount can be entered as a whole amount or percentage amount from the entry screen.
3.3.4 Elavon account settings
The Elavon account settings allow you to change the PIN Pad and MobileMerchant Portal sign in details. Note: This information can also be found in your welcome email.
3.3.5 Security
Within the Security settings, you can change the User PIN and disable the screen lock inactivity setting.
3.3.6 Additional customisation
Enable app sounds.
3.3.7 Update PIN Pad
The update PIN Pad setting updates the configuration, downloading any updates that are available.
You should now have completed the set up of the MobileMerchant App and be ready to take your first card transaction.
4.1 General app usage
4.1.1 Launching the app
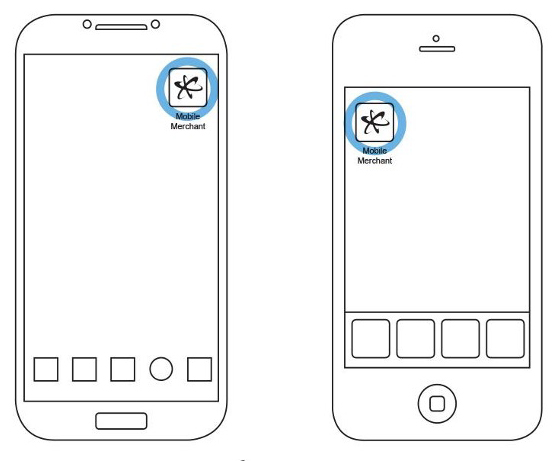
In order to launch the MobileMerchant App on your smartphone, locate the app icon on your smartphone and tap on the icon. If you cannot find the app icon, you can search your device for the app name and tap on the MobileMerchant App when it appears in the search results. If you cannot find the MobileMerchant App on your device, please ensure that you have correctly downloaded it from the appropriate store (Google Play™ or the App Store).
When you first launch the MobileMerchant App on your mobile device, a set-up wizard (see Section 3.2.1 First time use) will display to ensure that the app has all necessary information to process credit card payments accurately and securely. If you have already completed the first-use set up, you will be directed to the MobileMerchant lock screen when you launch your app.
4.1.2 Lock Screen
The Mobilemerchant lock screen is a feature of the app to provide protection and security to you, our customer. By default, the app will lock after 10 minutes of inactivity, but this functionality can be disabled in the Security Settings within the app menu by toggling the Screen Lock switch on iOS or Auto Lock on Android.
When you are on the Lock Screen, use the on screen keyboard to enter the PIN that you created for your MobileMerchant App. If you have forgotten your PIN, use Forgot your PIN? link and reset it.
4.1.3 Change or reset PIN
If you would like to change your PIN, you can access this feature through the Security Settings within your app menu by tapping Change User PIN.
On the Change User PIN screen, supply your current PIN then enter the new one that you would like to use to unlock your app. Confirm the new PIN, and then, tap the Change User PIN button to complete the change.
If you have forgotten your PIN, you can reset it by tapping the Forgot Your PIN? link on the Lock Screen and providing your MobileMerchant Portal credentials as well as a new PIN on the screen provided.
4.1.4 Support
If you need help using the MobileMerchant App go to the Support Menu for information or you can contact the MobileMerchant Support Centres – UK: 0845 600 1401 or IRE: 1850 812 134.
During the First time time set up, you can tap on the link at the bottom of the page that reads Need Help? – About MobileMerchant to access MobileMerchant’s Support screen. Once inside the app, the Support screen can be accessed through the Menu. If the Menu is inaccessible from your current screen, there will be a button which links to the Support screen in the top right-hand corner of the screen in the Navigation Bar. On the MobileMerchant Support screen, you will find contact information for MobileMerchant Support in the form of an email address, a phone number, and a web address hyperlink. Information about the version of MobileMerchant app that you’re using is visible. At the bottom of the Support screen, above the copyright information, there is a link to the Elavon Privacy Policy. If support is needed please contact us at:
MobileMerchant support centres – UK: 0845 600 1401 or IRE: 1850 812 134.
4.1.5 Privacy Policy
Elavon’s privacy policy can be found at the bottom of the MobileMerchant support screen or by visiting
4.2 Performing a sale
Performing a sale
Enter item price, quantity, and description (optional) and press the shopping cart icon to enter it in your shopping cart. Repeat until all items have been entered.
Review sale – Discount and gratuity are activated
- Review the transaction amount.
- Press Checkout to process the payment of the transaction.
- Add a discount (optional) by selecting Discount Amount Edit button.
- Allow merchant to add gratuity (optional) by selecting Gratuity Amount Edit button.
- Add a transaction note (optional). If you want to add or disable the discount, tax, or gratuity options select the menu option and select Settings.
- If you are currently in a transaction, finish or clear the transaction before editing the app settings.
Take a cash payment
- Take a cash payment
- Press the Cash button
- Select a tender amount using the quick buttons or press the Enter Other Amount button to enter the tendered amount.
- Once the tendered amount is entered, press the Check button to complete the sale.
Take a contactless credit or debit card payment using the PIN Pad
- Take a contactless credit or debit card payment using the PIN Pad
- Ensure the PIN Pad is powered on and in range. Then, press the Credit|Debit option under the Take Payment section.
- Hand the terminal to the cardholder once the Card Payment function has been selected (the MobileMerchant app should display “Take Payment – Waiting for card entry” and the display on the PIN Pad should prompt the cardholder to insert or swipe their card or alternatively to select OK to activate the contactless interface (see options below).
Chip & PIN transaction
- The most common type of card payment is the Chip & PIN transaction type. For this type of transaction the cardholder simply inserts their chipped card into the slot at the bottom of the PIN Pad (as instructed on the screen).
- The cardholder will then be prompted to confirm the transaction amount by selecting OK key.
- Once the transaction amount has been confirmed the cardholder is prompted to enter their PIN.
- Once the PIN has been entered correctly the transaction will be processed over the network.
- Once the transaction has been completed successfully the MobileMerchant App and the terminal will both display a success message. At this point the cardholder can be offered a receipt via email or SMS (these are sent from the MobileMerchant system rather than from the mobile phone itself, so no additional costs for sending SMS receipts are incurred).
Chip & signature Transaction
- Some chipped cards do not have PIN numbers and utilise the cardholder’s signature to verify that they are the cardholder. If such a card is inserted in the PIN Pad the MobileMerchant app will automatically request the signature to be entered on the screen of the mobile phone or tablet.
- The mobile phone or tablet will need to be handed to the cardholder for them to sign in the signature field.
- Once the cardholder is happy with their signature they simply select the Done option on the screen after which they are prompted to hand the mobile phone or tablet back.
- At this point the cardholder’s signature can be validated against the signature strip on the back of their card and if acceptable the Approve option should be selected to process the transaction.
- The transaction will then be processed.
- NOTE: For some older PIN Pads an Operator ID may be required to authorise the signature transaction – this is a four digit code made up of the last four digits of the Terminal ID (TID) – e.g. 12345678. If you can’t remember your Terminal ID you can either retrieve this from your original MobileMerchant welcome email, or by accessing the PIN Pad Credentials within your MobileMerchant app (although this second option will require the transaction in progress to be aborted and restarted once you have retrieved the Operator ID). The PIN Pad Credentials can be found in Settings>Elavon Account>PIN Pad Credentials.
- Once the transaction has completed successfully the same transaction summary and receipting options as above will be displayed.
Magnetic stripe and signature transaction
- Some cards may not yet have chips embedded in them, in which case the magnetic stripe will need to be utilised. The cardholder would typically be aware of how their card works and will simply need to swipe their card through the magnetic stripe reader at the top of the PIN Pad.
- The MobileMerchant app will automatically request the signature to be entered on the screen of the mobile phone or tablet and the same steps as detailed in section 4.2 will apply.
Contactless transactions
- Where contactless is supported on both the PIN Pad and the smart device (e.g. Apple Pay® or Android Pay™), the cardholder can select the contactless option when prompted by selecting the OK button on the initial screen below.
- Once the transaction has completed successfully the same transaction summary and receipting options as above will be displayed. 4.3. Magnetic stripe and signature transaction
- Some cards may not yet have chips embedded in them, in which case the magnetic stripe will need to be utilised. The cardholder would typically be aware of how their card works and will simply need to swipe their card through the magnetic stripe reader at the top of the PIN Pad.
- The MobileMerchant App will automatically request the signature to be entered on the screen of the mobile phone or tablet and the same steps as detailed in section 4.2 will apply.
4.3 Viewing past transactions
- Press the menu option on your mobile device or on the top of the app and select Transactions.
- Wait for the app to retrieve transaction details from the server.
- After the transactions have been retrieved from the server and displayed, scroll the list and select a transaction row to see more detail or to refund or void the transaction. By default, only transactions that occurred within the previous 7 days will be retrieved. If other criteria are needed, please see 4.3.3 Advanced Search opposite.
4.3.1 Refreshing past transactions
While you are viewing your transactions, you may wish to update the list by retrieving the latest information from the server. Android: Press the button on the top navigation bar. iPhone: Pull the transaction table down by dragging it with your finger. You should see an animated refresh icon, at which point you will release the table by lifting your finger off the device. The animated icon will continue spinning until the updated data has been retrieved.
4.3.2 Retrieving more results
Ten transactions are retrieved at a time in order to avoid retrieving more data than is necessary (if they occurred within the past 7 days). If more transactions are available then a Show More button will appear. Pressing the button will fetch the next ten transactions. When there are no more transactions to fetch, the Show More button will no longer appear. Android: The Show More button appears upon scrolling to the end of the list. iPhone: The Show More button will appear at the bottom of the screen, regardless of whether or not the list has been scrolled to the end.
4.3.3 Advanced search
The scope of the search can be narrowed so that particular transactions can be found more efficiently. The available criteria are:
- Date Range (required): Specify a date range. The start and end dates must be within 31 days or less of each other.
- Transaction type (optional): Choose whether you want to restrict the search to all transaction types, only sales, or only refunds (including voided refunds).
- Additional criteria (optional):
- Amount: The amount of the transaction
- Last 4 digits of card
- Card IIN: The first 6 digits of a credit card number are known as the Issuer Identification Number (IIN) – previously known as a BIN
- Note: Any text contained within the note, or user reference, of a transaction.
4.4 Transaction details
The details of a transaction will appear when it is selected from the transaction list. Upon initially viewing a transaction, more details need to be retrieved from the server about that particular transaction such as the refundable amount. You may notice that the transaction details are updated very shortly after loading a transaction. If the transaction is refunded or voided then those actions will be available (see below).
The details include:
- Transaction date – The date and time when the transaction was performed. This is shown according to the time zone of the device.
- Transaction amount – The amount of the transaction.
- Card details – This includes the type of credit or debit card, the last four digits of the card, the expiration date, and the type of transaction.
- Auth code – The authorisation code of the transaction.
- Result – Whether the transaction was approved or declined.
- Entry type – The code that indicates the manner in which the transaction was processed.
- Transaction ID – The ID of the transaction.
- Terminal ID – The ID of the PIN Pad on which the transaction was processed.
- Transaction state – Whether the transaction was committed or not.
- Settlement state – Whether the transaction has settled or not.
- Amount refundable – The remaining amount of the transaction that may be refunded.
- Amount refunded – The amount of the transaction that has already been refunded.
- Notes – The notes that were entered for the transaction, if any.
- Related transactions – For a sale, any refunds that are linked to this transaction. For a refund, the sale which was refunded.
4.5 Refunding a transaction
Depending on the status of a transaction, a sale might be refundable.
Examples:
- A sale that has been committed but not settled might be refundable.
- A sale that has been committed and settled might only be refundable.
- A sale that has already been fully refunded will not be refundable.
- View past transactions (see Section 4.3 Viewing Past Transactions), find and select the transaction that is to be refunded. On the transaction details, select the Refund button.
- Enter in the amount to be refunded. The total amount of the refund must be equal to or less than the total amount charged. Please note, if you have (exclusive) tax enabled, then the refund amount should just be the item amount excluding the tax portion, which will be calculated automatically and added to the total amount refunded. For example, a customer purchases an item costing £1.00 with exclusive tax of £0.07 (at a 7% rate) so pays a total of £1.07. If the customer then wants a refund, the item cost should be entered as £1.00 and the tax amount will be automatically calculated to equal the total amount of the refund, £1.07. If you entered an item cost of £1.07 then tax would be calculated on this amount and added, and would, therefore, exceed the total amount charged in the first place.
- Then, follow the steps that you would take to enter a sale transaction (See Section 4.2 Performing a Sale) as the steps to enter a refund are similar.
In addition to the MobileMerchant app and the PIN Pad that let you accept card payments from your customers in person, Elavon MobileMerchant includes an online portal, that offers you access to your credit and debit card transaction data (https://mobilemerchant.elavon.com/login.php). A more detailed user manual for the MobileMerchant Portal is available on our website and a link is also embedded in your MobileMerchant welcome email.
5.1 Reporting
The primary function of the MobileMerchant Portal is to provide a detailed reporting interface that lets you search for any particular transaction or any group of transactions for a configurable date and time range.
5.2 Taking card payments remotely
In addition to the reporting interface, another key function that can be utilised (depending on your credit rating and preferences) is the Virtual Terminal (shown below). It lets you take card payments over the phone in situations where a customer may be ordering a product or service in advance, or may not be present to pay with their physical card using the PIN Pad.
If you have an Elavon MobileMerchant account, but do not have access to this part of the MobileMerchant Portal, please contact the support team to find out if your account can be updated to include this feature.
6.1 Common errors in the app
Connectivity issues. One of the most common reasons why transactions may fail in normal operating conditions is a lack of network connectivity. Mobile terminal solutions are designed to work anytime and anywhere and require the mobile phone or tablet that is being used with the PIN Pad to have network access at the time of each payment. This can be access to a mobile network or a Wi-Fi network; a lack of consistent network access will mean no payments can be processed.
- In such cases it is advisable to find a way of getting network access which may involve switching to a local Wi-Fi network or using a mobile Wi-Fi hotspot from another device (with permission of the owner if the device belongs to someone else).
Transaction history not available Another common error is when transaction history data is no longer available in the app. The most common reason for this is that the MobileMerchant Portal (WebMIS) password has expired and needs to be reset, or has been changed online and needs to be updated in the app.
6.2 Charging and battery related issues with your PIN Pad
Optimising the battery life of your terminal Mobile payment PIN Pads use batteries not only for portable/ mobile use, but also to help protect the PIN Pad from hackers and fraudsters by enabling regular security checks on the security keys that are embedded in the PIN Pad. It is therefore important to ensure that the PIN Pad is sufficiently charged at all times. A failure to keep the PIN Pad sufficiently charged can result in the security mechanism shutting the PIN Pad down (below a certain charge level, the security keys will be deleted, rendering the PIN Pad unusable, until reactivated by the manufacturer in a secure environment).
- During normal operation the battery charge will be used up and when the charge level hits a pre-defined threshold a prompt will be displayed on the screen of the PIN Pad: “BATTERY LOW”.
- It is important to charge the PIN Pad at the earliest possible opportunity after this prompt is displayed on the screen to prevent any risk of the charge dropping below the minimum required levels to prevent the deletion of the security keys.
- When PIN Pads are stored for longer periods without being used, the batteries will also discharge so it is important to charge the PIN Pad from time to time. The recommended intervals for charging PIN Pads that are not in constant use is at least 3 months, but it is advisable to check charge levels every month as PIN Pad batteries that are not used regularly will not offer the same performance range as batteries that are used and charged more frequently.
- Long-term storage can lead to a reduction in battery capacity, although maximum capacity can be regained by going through several cycles of fully charging and discharging the battery.
- Optimal operating and storage conditions – when using and storing the PIN Pads it is advisable to stay within the following guidelines to optimise the operating efficiency and life expectancy of the battery:
- When charging the battery, ensure the ambient temperature is within 00 C – 450 C
- In general usage scenarios the ambient temperature should remain within the –100 C – 550 C range • If storing the PIN Pad over longer periods the optimum range in the storage location should remain within the -100 C – 250 C range
Charging symbol on the PIN Pad screen When the PIN Pad is switched on and plugged into a charger, the charging icon will appear on the screen of the PIN Pad. If the PIN Pad is not switched on, this icon will not appear on the screen, but the battery will still be charging while the PIN Pad is plugged in. If charge levels in the battery permit, the PIN Pad can be powered on to see the charging icon and charge status
Invalid BPK In cases where the battery charge has dropped below the required level referred to in section 6.2 above, the security keys will be deleted and the message Invalid BPK will be displayed on the screen of the PIN Pad. This message would also be displayed if the PIN Pad has been tampered with in any way as it is the standard security mechanism.
If this occurs, you will need to contact Elavon’s Support Team who will advise on how to obtain a replacement as the PIN Pad will not be able to process transactions.
If your Elavon account includes the use of the MobileMerchant Portal (WebMIS) for card-not-present transactions, you can still process payments remotely using this feature.
6.3 Mobilemerchant Portal
Keeping your password up-to-date Security is a key requirement where card payments are concerned. All providers of online interfaces such as the MobileMerchant Portal are required to enforce a password change every 90 days. All customers will therefore receive a password expiry reminder email in the run up to the end of each 90 day period. It is advisable to login to the MobileMerchant Portal to update your password as soon as the reminder email is received.
Once you have updated your MobileMerchant Portal (WebMIS) password online, you will also need to change the MobileMerchant Portal (formerly WebMIS) password in your MobileMerchant app in order to be able to access your transaction history view in the app:
- Go to the Settings Menu
- Select Elavon Account
- Select MobileMerchant Portal or WebMIS (depending on the version of your app. Please ensure you update to the latest version of the app)
- Type in your new Password
Your till provider will need to carry out the development work required, with the full support of Elavon’s Smartlink Team all along the way. Once development is completed, our Smartlink Team will provide the developers with a test script, specific to the functionality they’ve developed to handle. On the successful completion of this test script, the development will be accredited and integration of till with your card terminal can now proceed, again with the full support of Elavon.
There are two Smartlink integration options available:
- Smartlink Lite – With a Smartlink Lite development, only the Sale is handled from your EPOS, all other transaction types, reporting, merchant and customer copy printing of receipts etc. are handled from the card machine, as though it were still in standalone mode. As only 1 transaction type needs to be supported from the EPOS this is generally a very quick and easy development to complete and accredit.
- Smartlink Pro – With a Smartlink Pro development, some, or all, of the transaction types, reporting etc. can be handled from the EPOS, depending on your requirements. Printing of merchant and customer copy receipts, reports etc. can also be handled on the EPOS, or can remain on the card machine. A Smartlink Pro development can take longer to complete depending on the functionality you want supported from the EPOS.
Elavon will provide your developers with a DLL library for Linux (Fedora and Ubuntu), and Windows Operating Systems. However any operating system, Android, iOS, etc. can be supported using a TLV development, which removes the need for the DLL library that we provide. Your developer may also choose to complete a TLV development on a Linux or Windows OS too.
Your developers can request our Smartlink developer pack from Elavon for review. This pack contains all documentation needed to complete a development. It also contains our Smartlink simulator and DLL library for Linux and Windows development. Our Smartlink team are available to answer any questions your developers may have while reviewing the pack.
Following review, if development is proceeding, Elavon will provide your team with a test device and test cards, along with full support and advice throughout the development phase. We will then provide a test script on completion of development to accredit the solution.
Your account manager will keep you updated on the progress along the way and Elavon’s Smartlink team can also provide an overview of integration to your staff if needed.
Any business accepting credit or debit card payments is required to comply with the Payment Card Industry Data Security Standards (PCI DSS). We aim to support our customers all along the way with achieving and maintaining PCI DSS compliance if they integrate a card machine to their till system.
No sensitive card data is passed from the card machine to your EPOS/till system, so compliance is easier. Should you wish to store tokenised card data however, then tokenisation can also be supported by your Smartlink development.
Point to Point Encryption (P2PE) is also supported by Smartlink, removing your network from the scope of PCI Compliance.
Additionally, your card machine automatically updates when new software and firmware versions are available, ensuring it’s fully compliant with latest mandates.
Elavon Terms of Service Ireland
Elavon Terms of Service French
Elavon Terms of Service Spanish
Elavon Terms of Service Dutch
Helping thousands of customers around the world grow their business through payments
Customer service and support
We’re here to help!
Customer service: 0818 20 21 20
8am to 6pm, Monday to Friday
Elavon technical support: 0818 30 31 30
24 hours a day, 365 days a year
Opayo product support: 01 240 8731
24 hours a day, 365 days a year
Copyright© 2024 | Elavon Financial Services DAC. Registered in Ireland – Number 418442.
Registered Office: Block F1, Cherrywood Business Park, Dublin 18, D18 W2X7, Ireland. Elavon Financial Services DAC, trading as Elavon Merchant Services, is regulated by the Central Bank of Ireland.
Helping thousands of customers around the world grow their business through payments
Customer service and support
We’re here to help!
Customer service: 0818 20 21 20
8am to 6pm, Monday to Friday
Elavon technical support: 0818 30 31 30
24 hours a day, 365 days a year
Opayo product support: 01 240 8731
24 hours a day, 365 days a year


Copyright© 2024 | Elavon Financial Services DAC. Registered in Ireland – Number 418442.
Registered Office: Block F1, Cherrywood Business Park, Dublin 18, D18 W2X7, Ireland. Elavon Financial Services DAC, trading as Elavon Merchant Services, is regulated by the Central Bank of Ireland.